-BjC_FuvC.svg)

What if you justfixed it yourself, in a second?
Imagine that instead of explaining to the AI over and over how to fix the design, you could simply do it yourself — in one second.
In the previous post I showed how I use AI to produce designs that do not look like AI slop. But we all know what happens after you reach a good first version in code: the genuinely exhausting part begins — the ping-pong of finishing touches.
The editing layer needs a mouse and room to work. Open this on a laptop to try it yourself.
Five seconds with a mouse.Twenty minutes of prompting.
It burns time, tokens and rounds of prompting — all to explain something that would have taken exactly five seconds to do yourself, with a mouse.
The editing layer needs a mouse and room to work. Open this on a laptop to try it yourself.
Like Figma,inside the browser.
So to solve it, I built a few Skills that work together behind the scenes and close the last mile for me.
Think of it as Figma inside the browser — except this one is wired directly into the codebase and understands the structure of the product in depth.
Not a browser extension bolted on from outside. It lives in the project, next to the code it is describing.
The editing layer needs a mouse and room to work. Open this on a laptop to try it yourself.
Same card, live handles.
Eight handles for size, a double-click for text, and a panel that already knows which design system this card belongs to.
First it looks for a design system.No system? It offers to build one.
The first thing the system does is scan the project for a design system. There is not one? No problem — it offers to build one itself, out of what already exists in the product. Then it maps everything:
- Components. Which elements live there — buttons, cards, modals, input fields.
- Colours. The full palette and how it is used — primary, secondary, states, backgrounds.
- Typography. The size scale, the weights, and the heading hierarchy.
- Grid and spacing. How the spacing scale works and what the breakpoints are.
The editing layer needs a mouse and room to work. Open this on a laptop to try it yourself.
Sizes, spacing, radii.With your hands.
This is where a second Skill comes in and lays a visual editing layer over the product. Through it I can simply click and edit.
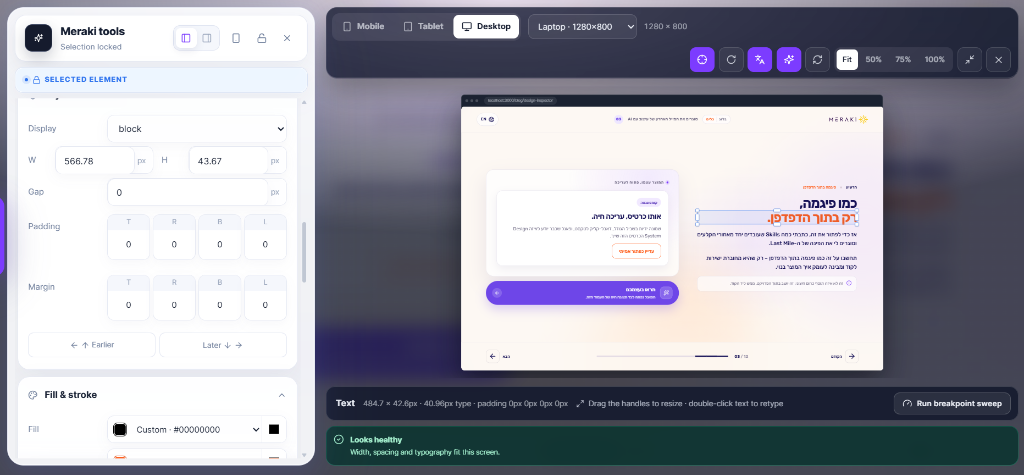
Lock an element and it gets eight handles. Drag one and it resizes under your hand — on the real screen, reflowing for real.
The editing layer needs a mouse and room to work. Open this on a laptop to try it yourself.
Stretch this headline.
Padding, gaps, corner radius and opacity are all in the panel beside it — the same values the design system already defines.
Rewrite the text.Right where it sits.
Double-click any piece of copy and type over it. Colour, font, weight, line height and tracking are all one panel away — bound to the tokens the project already uses.
Press Enter and it keeps both the old wording and the new one, because that pair is what a developer actually needs.
The editing layer needs a mouse and room to work. Open this on a laptop to try it yourself.
Say it better.
Double-click this sentence and write what the copy should actually say. The original is kept alongside your version.
“No, only on mobile.”Fine. Here is mobile.
Checking and fixing responsiveness is part of the same layer. The preview is the real product at real device dimensions, and an edit made in the panel shows up inside the phone immediately.
You can easily switch between Desktop, Tablet, and Mobile views to ensure your design looks perfect across all screen sizes.
Right-to-left is a toggle in the same toolbar, so a Hebrew layout gets reviewed instead of assumed.
The editing layer needs a mouse and room to work. Open this on a laptop to try it yourself.
Same card, smaller world.
You can easily switch between Desktop, Tablet, and Mobile views to ensure your design looks perfect across all screen sizes.
One card,or every instance of it.
This is the part that matters most: updating a component across the board and seeing the result immediately, on the real screen.
The system is smart enough to understand whether I changed one card as a one-off, or whether this is a global update that has to apply to every instance of that component.
That single distinction is the difference between a tweak and a system change — and it is what most handoffs get wrong.
The editing layer needs a mouse and room to work. Open this on a laptop to try it yourself.
The panel counts the matching variants for you before you commit to changing them.
The real magichappens at the end.
The system saves every change I made and produces a terrifyingly detailed changelog: what exactly changed, in which component, at which breakpoint, and the new values that need to be applied.
- The old value and the new one. Not a screenshot of the result — the actual pair.
- Which component. With the selector, and whether it was global or a one-off.
- Ready-to-paste CSS. Token declarations, direct rules and state rules.
The editing layer needs a mouse and room to work. Open this on a laptop to try it yourself.
Change me, then read the log.
Resize this card, recolour it, rewrite this sentence — then open Designer changes and copy the result.
Hand the documentback to the agent.
I simply pass that document back to the agent, which implements all of it in code, cleanly and in order.
- Without dozens of frustrating round trips.
- Without burning tokens on “make it a tiny bit smaller”.
- And above all — without losing control of the design at exactly the stage that most affects the final result.
The editing layer needs a mouse and room to work. Open this on a laptop to try it yourself.
Play around.Try it yourself.
I built this locally, inside the project itself, and not as an external browser extension — it was critical that it be wired into the veins of the project’s design system. Beyond the accuracy today, it lays the groundwork for a lot more automation to come.
Nothing you do here touches the actual source files, and nothing leaves your browser. So feel free to completely mess up the design on the right.
The editing layer needs a mouse and room to work. Open this on a laptop to try it yourself.
Do your worst.
Nothing here touches the source files, and nothing you do leaves this browser.
Get the Skillfor your own projects
This is the skill that I built for myself to build something like this. You are welcome to copy, adjust, and build it into your own project.
Just run the command below, or head over to the GitHub repository to see the source code and learn how to integrate it with your design system.
The editing layer needs a mouse and room to work. Open this on a laptop to try it yourself.
npx skills add meraki/design-inspector